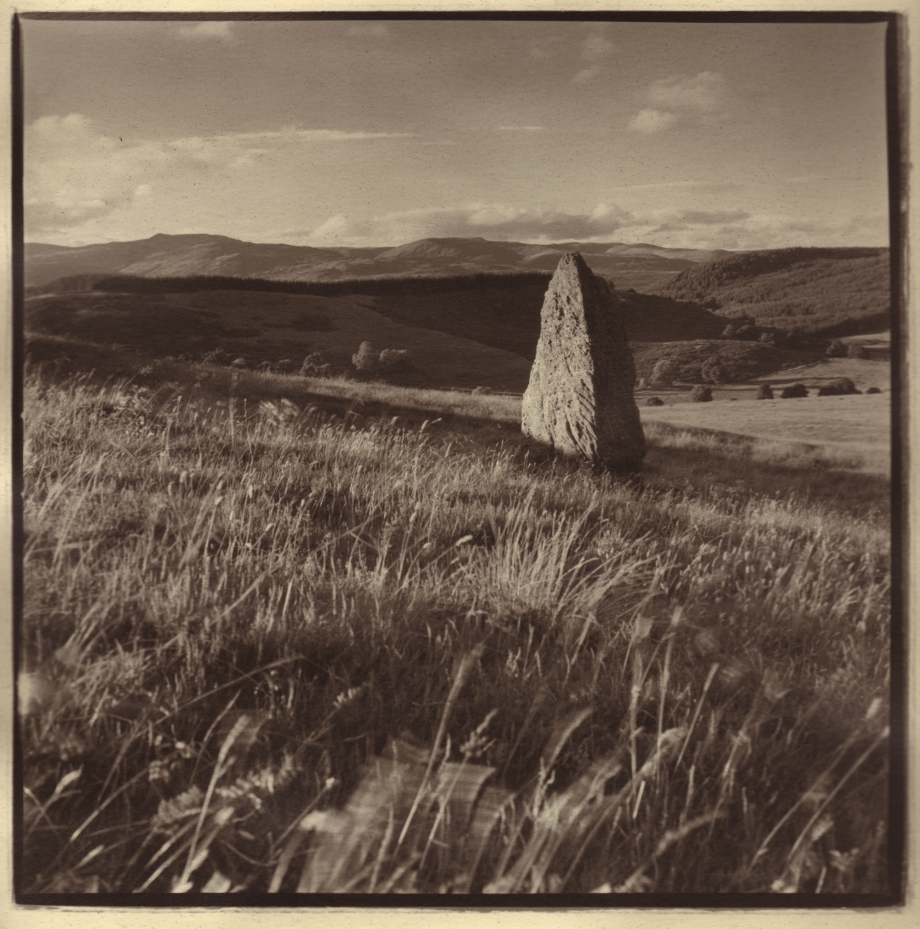
Standing Stone, Perthshire, July 2016. Hasselblad 503cx, 80mm, Ilford HP5, Red filter.
In the autumn of 2015 a good friend and like-minded photographer came to stay with me for a few days. It wasn’t long before a subject that we’d discussed on many occasions began to become a reality. Driven on by Ronnie’s enthusiasm for making something from nothing, the double garage was very quickly being emptied of most of its contents, including piles of firewood and being re arranged. The De Vere 504 enlarger (bought some 10 years previously in London and which had been languishing under a dust sheet) was being positioned alongside an old chest of drawers, the perfect surface for the developing trays. Over time I had already collected the usual selection of second hand Paterson darkroom equipment so there appeared to be no real initial set up costs.
With the potential darkroom equipment and ‘furniture’ roughly positioned a chance find on ebay revealed a De Vere 203 for sale a couple of miles away in Killearn. To be honest, a second enlarger at this point in time was not on my to do list, but – it was going begging and with no expensive delivery costs it made sense to investigate. Having contacted the seller we jumped in the car and went to view the enlarger. The owner had been a professional newspaper photographer and was clearing out his beloved equipment, no longer willing to put up with the chemicals in the era of digital. With a very reasonable price agreed plus a few trays thrown in we installed the second enlarger into the new space. An old plastic ground sheet was used to seal off the printing area and with the garage door shut the now two-enlarger ‘darkroom’ was essentially ready to be used.
During the winter of 2015 I made a couple of prints for clients and had them framed by Egg & Dart in Glasgow. This was incredibly satisfying and made me realise just what could be achieved with a basic darkroom set up. I have been shooting film for decades but rarely printed my work, always using high-end digital scanners to produce the final image. Returning to the darkroom has opened up a whole new sphere of possibilities giving new impetus to my landscape work, including the opportunity to experiment with alternative printing and processing. I’ve already begun to increase the amount of bw film that I am shooting using my various medium and large format cameras – a good thing as it’s often too tempting to just grab the digital and feel guilty for a while. More about my old film cameras in future posts.
July 2016 and a certain Ronnie friend came to stay again. This time I found myself on the Jewson website ordering 5 x sheets of wooden OSB3 board to be used to make the walls of a light tight darkroom. Next, the following two days are spent re learning long forgotten DIY ‘skills’ in conjunction with consuming quite a few almond Magnum ice creams, the space was just about complete, with only some new electric sockets and an inexpensive extractor fan to be fitted at some point TBC.
The darkroom really is surprisingly dark and feels right, and for the money I think is looking really good. Obviously the acid test will be working in the space, especially during the cold winter months. It’s still only a halfway house to something more substantial but having been created for very little cost it’s a humble beginning to hopefully some very exciting future possibilities. Last night, and with solid walls, I made my first print. The Hasselblad image was taken during a walk in the Perthshire hills with Ronnie Randall, as we discussed the ideas for the new darkroom.
